Are you wondering what to do next after installing your WordPress blog? Well, WordPress is the most popular free and open-source content management system.
WordPress was released on 27 May 2003 by its founders, American developer Matt Mullenweg and English developer Mike Little. WordPress is built on PHP and MySQL and licensed under the GPLv2. It is also the platform of choice for over 43% of all sites across the web.
WordPress has made it easy to create beautiful websites without any coding knowledge. You can easily create any website like a Blog, eCommerce store, Social network, or Business website using WordPress.
But what to do next when there is no mention of basic requirements such as general setting adjustments, enabling data analytics, setting up contact forms, and other website essential things.
In lacking knowledge, most beginners start writing blog posts after installing WordPress. So they are making a little bit of a mistake.
Want to know what to do next after a new WordPress installation. So you’re in the right place to learn the essential things.
In this article, you will learn how to set up your WordPress blog properly after a fresh installation of WordPress.
So let’s get started now!
Things to do After Installing WordPress
After the new WordPress installation for your blog, a theme, dummy posts, dummy pages, and dummy comments also come with it by default.
So the first thing you need to do is:
1. Remove Default Content
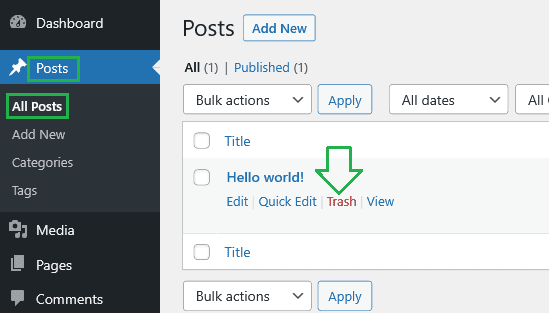
Log in to your WordPress dashboard, go to Posts – All Posts, and click on the Trash link to remove the default “Hello world” post.
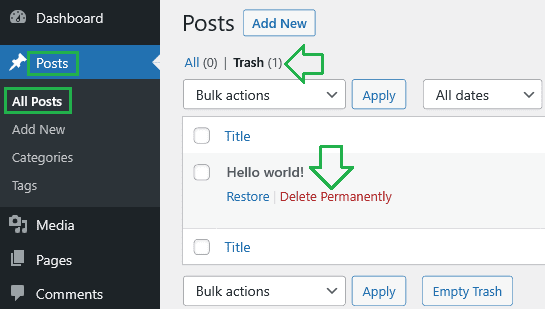
The same post is stored in the Trash when you click on the trash link. Now go to Trash and click then delete permanently.
Follow the same steps to remove “Sample Page” and “Comments” from your WordPress dashboard.
2. Set Site Title, Tagline, and Timezone
Your site title and tagline should be unique. It indicates to individuals and search engines like Google what your website is about and appears in various places such as the title bar of the browser screen.
Suppose you forget to set your site title and tagline at the time of WordPress installation. In the Settings section, you can edit the title and tagline of your WordPress site at any time.
To change your site title, tagline, and time zone, go to Settings – General and adjust these settings according to you.
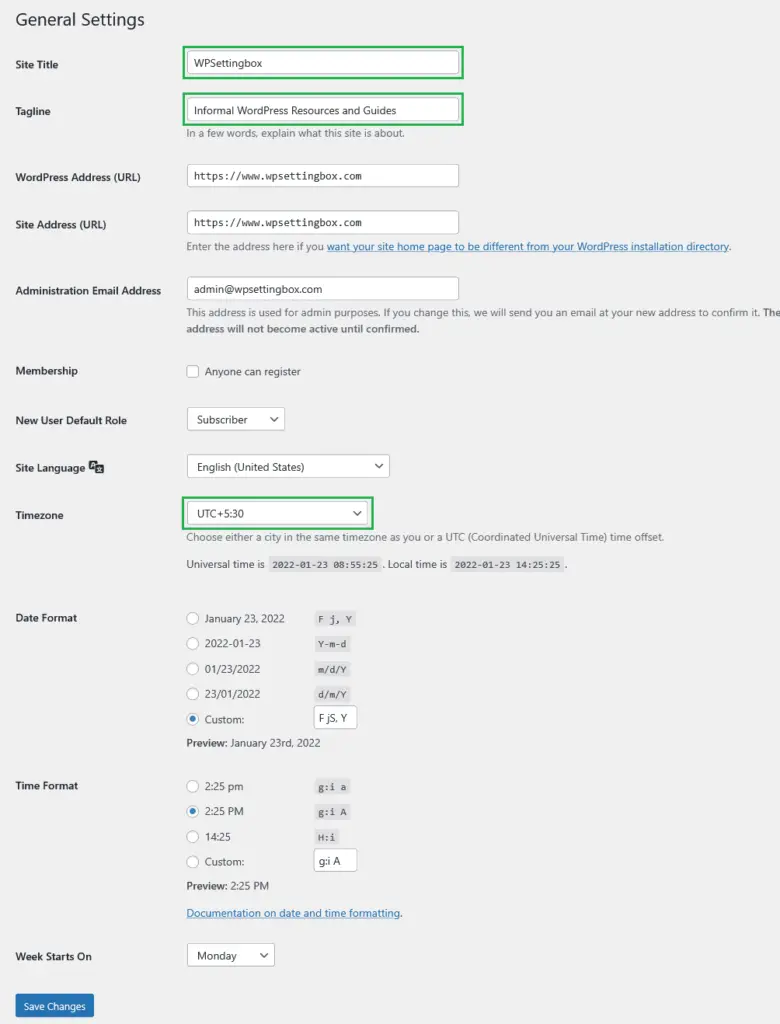
Please be sure to set your timezone to your local time.
If you want to create a multi-author blog, check the Anyone can register box to allow this and set the New User Default Role as Author.
If you don’t want people to register on your site, uncheck the Anyone can register box and set the New User Default Role as Subscriber.
After making the changes, now finally click on the Save Changes button.
3. Choose Your Discussion Settings
In the discussion settings, you can customize everything, including what information is collected and shown at the bottom of posts in your WordPress comments section.
You can find all these settings under the dashboard in Settings – Discussion.
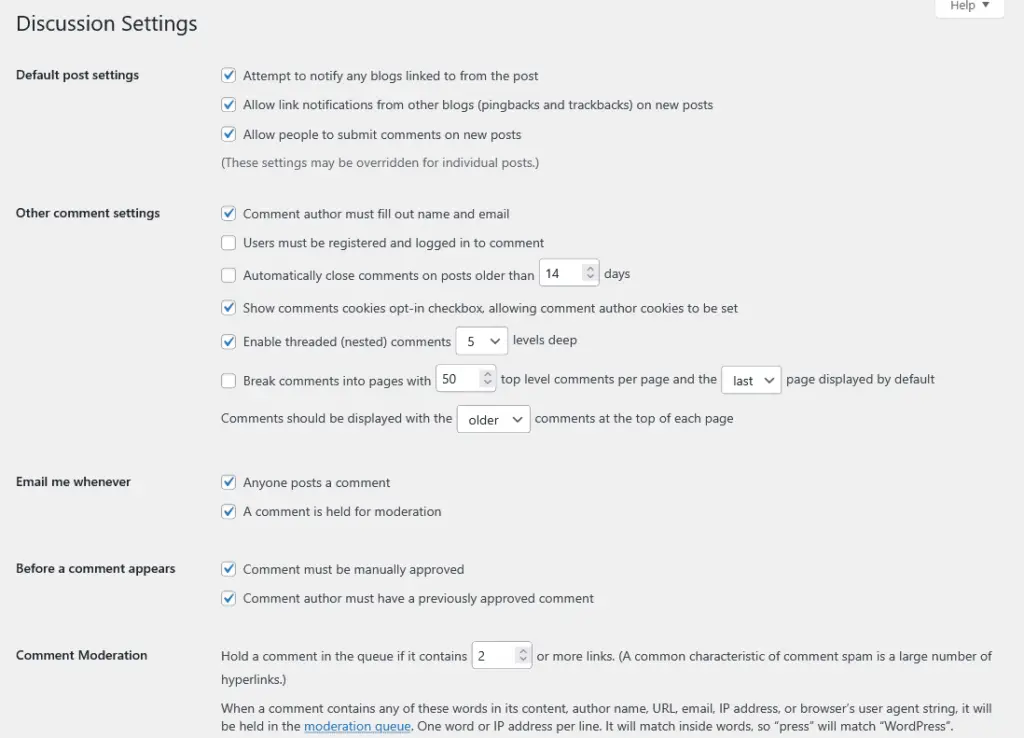
Blog comments are the best way to engage with your users, and it allows you to understand your user’s needs. Once you enable user registration, users will be able to comment.
However, there are other settings to do in the discussion setting. You can choose who will comment on your site such that the user needs to fill in a name and email, or they need to be registered and logged in to leave a comment.
You can automatically turn off comment sections on old articles, enable nested comments, and turn on pagination for long threads.
Please don’t forget to click on the Save Changes button after making changes.
4. Set Up Spam Protection
We all hate spam. Spam comments are a headache in WordPress. It is annoying and hurts the credibility of your site.
Most comments contain links to malicious websites. Spam comments can affect your search rankings and the reputation of your website.
You can enable comment moderation in WordPress to combat spam comments.
To fix this, you need to install and activate the Akismet plugin. It is a WordPress anti-spam plugin that comes pre-installed on every WordPress website.
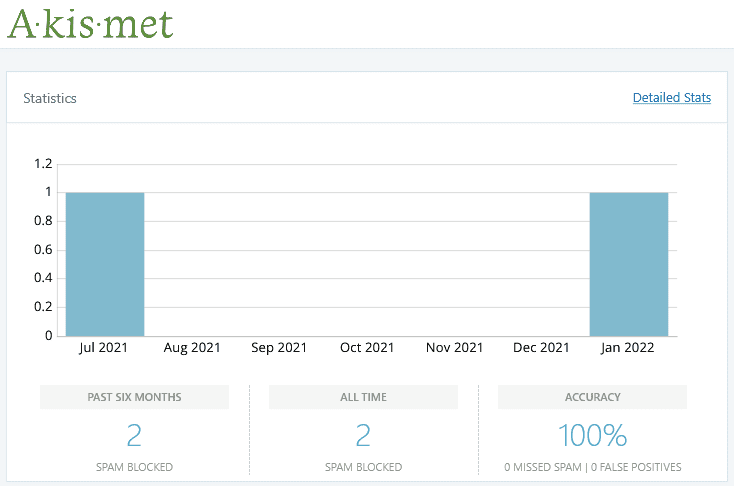
Akismet filters out comment spam, so you can focus on what’s more important.
5. Specify Your Permalink Structure
The permalink structure determines how links to your site’s pages, articles, and resources will appear on your site. The link to each piece of content must be permanent and should never change.
WordPress gives you the ability to create a custom URL structure for your permalinks and archives.
By default, the WordPress permalink structure looks something like http://yourdomain.com/p=123. This permalink is short but not search engine friendly.
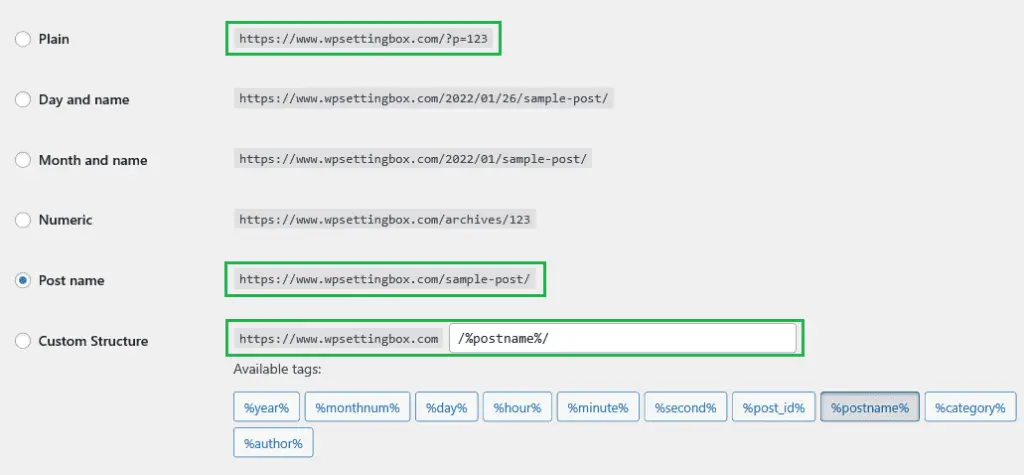
To change the permalink, go to your WordPress Settings – Permalinks. There are six permalink structures you can choose from, including the custom option.
I suggest you choose the Post name permalink structure, which is usually the best option.
You can even create a Custom Structure for your permalink structure to include the Day and Name or Month and Name options, both of which add dates to the URL of your content.
6. Set Up Contact Form
Contact form is the best way to allow your website users to contact you by filling out a form. Almost all websites require a contact form to communicate with their users and resolve user queries.
After setting up your website, it’s essential to include a contact form, whether you’re a business, non-profit organization, e-commerce, or a simple blog.
By default, WordPress does not come with a built-in contact form. So you need to add a contact form to your WordPress site.
In the WordPress plugins repository, there are many contact form plugins for adding contact forms.
I recommend WPForms, Contact Form 7, and Ninja Forms for adding contact forms to your website.
7. Set Up Front and Blog Pages
By default, WordPress displays your blog posts on the homepage. Most bloggers want a static home page to create custom layouts on their website.
To create a custom home page and a separate blog page for your website, go to Settings – Reading and select Pages for Home and Blog page for your website.
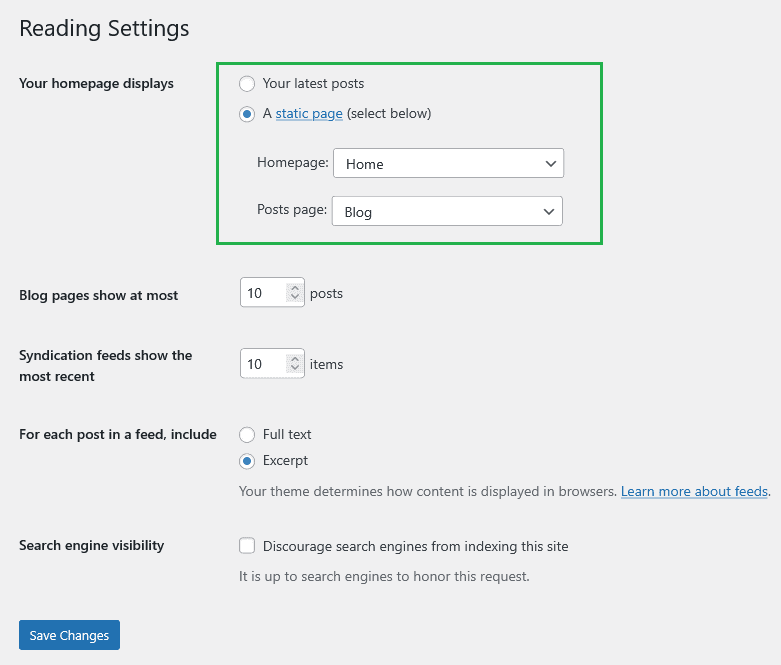
In this setting area, you can also set the number of blog posts shown on the blog page on your website.
After making changes, please don’t forget to click on the Save Changes button.
8. Create a Default Category
It is necessary WordPress posts must be filed under at least one category. By default, WordPress uses the Uncategorized category as the default category.
WordPress posts are automatically filed under the default category Uncategorized if you do not change this category.
To change the default category, go to Posts – Categories and edit the default category name and slug.
You can also create a new category and set it as the default category.
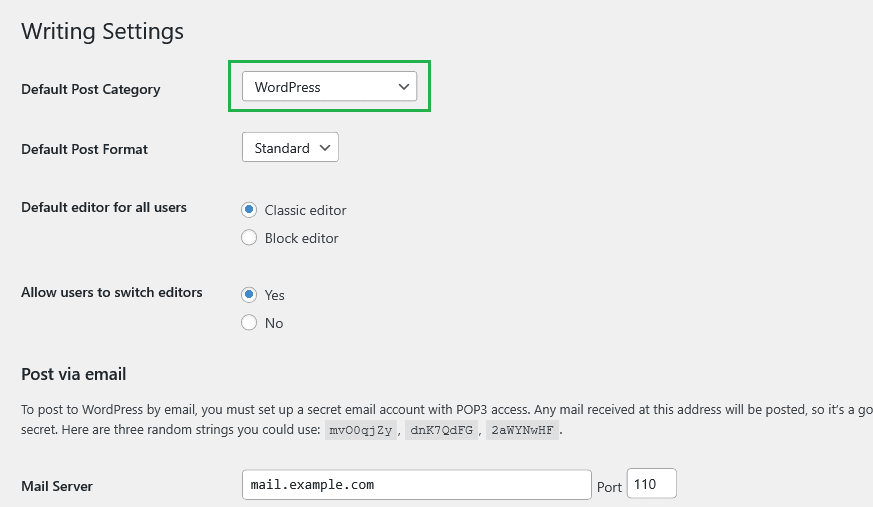
To set a new default category, go to Settings – Writing, and choose the new category you created earlier.
Now click on the Save Changes button to take action in Changes.
9. Complete Your User Profile
After setting up your WordPress, it’s time to fill out your user profile. To update your information, go to Users – Your Profile, and complete your profile with all the information.
Now finally, click on the Update Profile button to update it.
10. Remove Unused Plugins and Themes
The default installation of WordPress comes with two plugins (a) Hello Dolly and (b) Akismet.
It is a good idea to have the Akismet plugin, as it is one of the best plugins to prevent spam from comments from your website.
You can remove the Hello Dolly plugin. Although there’s no need to keep it, it’s not worth much.
It is easy to remove unused plugins to keep your site clean and faster.
Log in to your WordPress dashboard navigate to Plugins – Installed Plugins. Now first, Deactivate the plugin and then click on the Delete link.
Usually, new bloggers use and install several free WordPress themes to check which WordPress theme would be best suited for their website. In the end, they forget to remove these themes.
Similarly, you should remove unused themes.
Be sure to remove themes that are not active and keep at least one default theme installed. This theme helps you change themes if your WordPress website has any issues or troubleshooting errors.
To delete a theme from WordPress, go to Appearance – Themes and click on Theme Details.
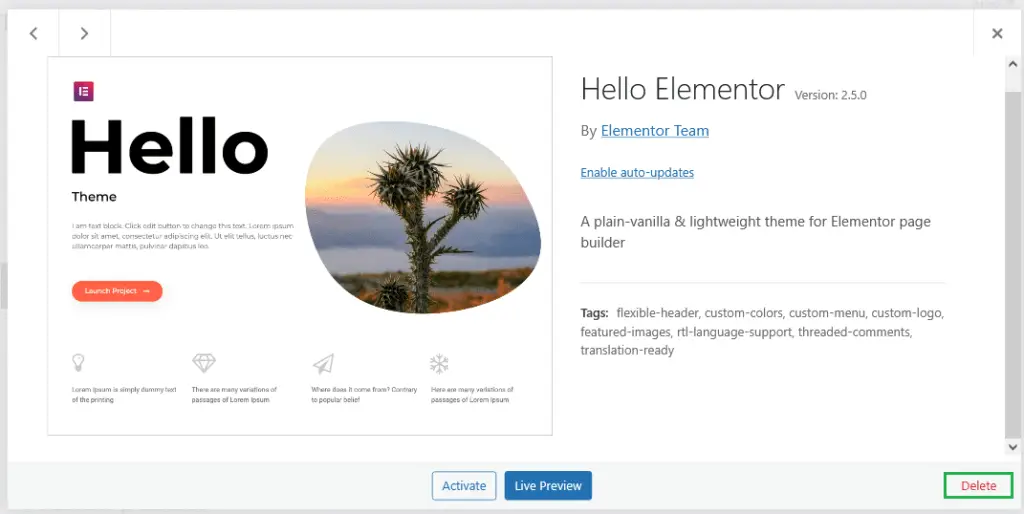
From there, you can see the Delete option in the bottom right corner. Click on the delete link to remove the theme.
11. Upload Your Gravatar Profile Picture
Gravatar is a free service for providing globally unique avatars. It powers your public profile, visible wherever you post, comment, and interact online.
WordPress uses Gravatar to display user photos in author bios and WordPress comments.
To create your Gravatar profile, visit Gravatar’s website and create an account using the email address you used in your WordPress account.
12. Upload a Site Icon or Favicon
Site icons or favicons are small images that appear in a browser tab to the left of your site’s title and tagline. It helps users to identify your site and increase brand recognition. Also, Google likes it.
To upload a site icon or favicon first, you will need to create an image to the exact size of 512×512 pixels in dimensions.
You can choose the image format as png, jpeg, or gif.
Now, go to WordPress Appearance – Customize – Site Identity. From there, click the Select site icon button and upload the image you want to use as the site icon.
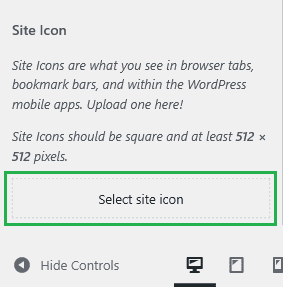
After that, click Publish button to save the new settings.
13. Set Media Settings
This setting controls various settings related to images and other media. To configure your WordPress media settings, go to Settings – Media.
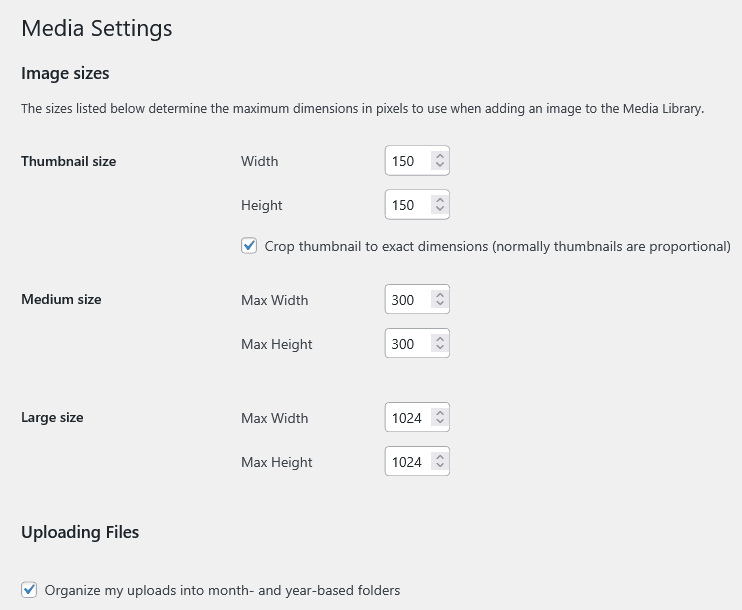
Here you can set various media sizes that best suit your requirement.
14. Install Caching Plugin
Imagine, what if your website loads slowly? Website loading affects your business. If your website loads slowly, you lose conversions, users, and page views, and that’s a loss of business.
All website owner needs to make sure that their website is fast and performs well even in high traffic volume.
Caching reduces the server load on the website and improves the page load speed to provide a better experience to the site users.
There are a lot of caching plugins available for WordPress, but I recommend just using WP Super Cache, W3 Total Cache, WP-Optimize, or LiteSpeed Cache.
All these caching plugins are the most trusted and used by top bloggers.
I’m using LiteSpeed Cache on this site, and it is one of the best caching plugins for WordPress.
15. Set Up WordPress SEO
SEO stands for Search Engine Optimization. Search engine optimization helps in improving the quality and quantity of website traffic from search engines to websites or web pages.
Good SEO practices make your website search engine friendly and help increase your site’s visibility and traffic.
WordPress is quite SEO-friendly, and there are many popular SEO plugins out there right now.
To install a plugin for your site’s SEO, go to Plugins – Add New and search plugins for SEO.
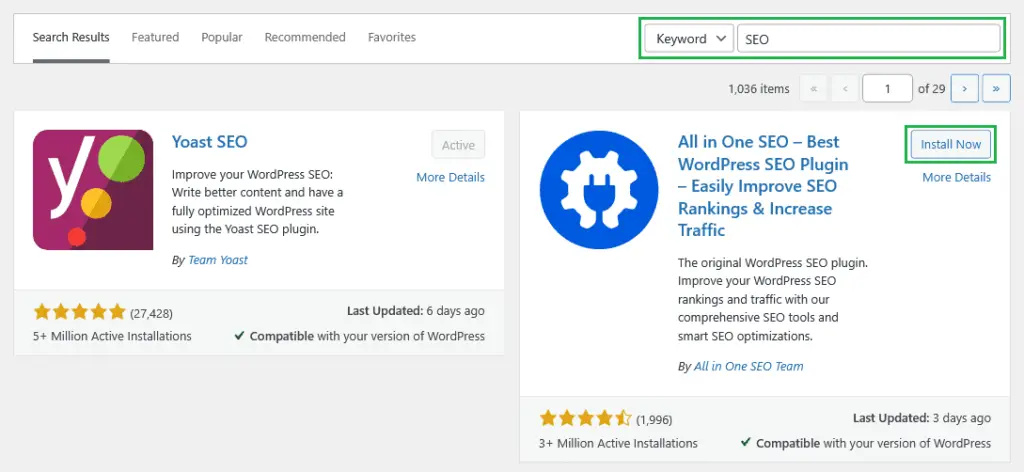
After finding your preferred SEO plugin, click on Install Now button and then click on Activate button to use it.
There are a lot of popular SEO plugins out there like Yoast, All in One SEO, Rank Math, and SEOPress, but I use Yoast for my websites.
16. Choose a Theme
After setting up your WordPress site, the next step is to choose a theme for your site.
Themes have a significant impact on the success of your website. It depends on the theme how your website looks.
It is good practice to choose a responsive, fast, secure, and SEO-friendly WordPress theme for your site.
You can find a lot of free WordPress themes in the WordPress themes directory or even upload your popular premium theme.
To install a free theme directly from your WordPress dashboard, go to Appearance – Themes and click on the Add New button. Now you will be prompted to a new window, where you can choose your favorite free WordPress theme.
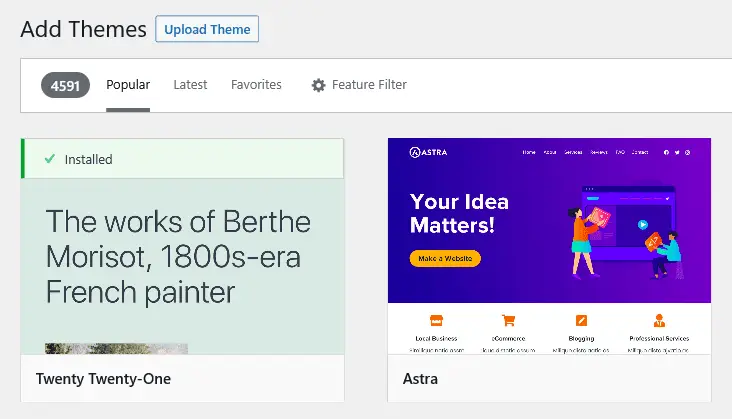
To install your favorite theme, click on the Install button, and Activate it to use it for your WordPress blog site.
17. Link Your Website to Google Analytics
After building your website, it is a great thing to track your website performance. Connect your website to Google Analytics to track your website statistics and plan the best strategies for it.
Almost all successful websites use analytics to understand their website traffic, user behavior, and other information to understand the needs of their audience.
18. Create a Backup Plan
Backing up your website is one of the more significant steps to protect your website from accidental damage, malicious attacks, hacks, and technical errors that can cause damage.
You can restore everything from your website’s backup system. It saves you the time and hard work you put in earlier.
However, WordPress does not have a built-in backup system. That’s why it’s best to use a plugin like BackupGuard, VaultPress, or UpdraftPlus Backup.
Final Thoughts
Setting up properly your first WordPress installation is a fun thing to do. Perhaps, as a newbie blogger, you forget to set up your WordPress blog site in a proper way. I believe this guide will help you a lot if you’re new to starting a blog.
I hope this tutorial will help you learn how to properly set up your new installation of the WordPress blog site.
If you liked this article, please show your love by sharing it on your favorite social media channel and also send your thoughts in the comment section.
I love your comments. It makes me more precise to give you the best WordPress resources and guides.
You can follow WPSettingbox on Twitter and Facebook to get fresh and updated content.
I found you through a blogger’s post on Twitter. I liked this blog post. I wish I had found this six months ago when I started my blog.
Glad to know that you found it helpful. You can share this post with new bloggers who need it.
Thank you so much!
It is helpful for anyone who wants to start a new blog!
Hey Helen, I’m grateful you found this helpful.
Thank you so much!
Awesome super in-depth for setting up your blog. Thank you for sharing.
Ah! I’ve just recently started blogging, so this really helps a lot. Thank you so much!
What a great and comprehensive list. So helpful!
I have had my WP site for a while now. You have inspired me to go in and clean it up with all these things.
Thank you!
Thank you so much for finding it helpful.
Man, I must have loved these tips when I first started! It took me so long to sort out the important things!
Hi, thanks for this is so helpful.
Can I use option 13 to change the size of my featured image on my posts?
Of course, you can try it, but I suggest you try a particular size for all your featured images.
It makes your featured image template better.