Are you looking for a way to customize the Back to Top button in the GeneratePress theme? So in this article, you will learn about the proper customization of the Back to Top button in the GeneratePress theme or any other WordPress website.
In this tutorial, you will learn two ways to add the Back to Top button to your WordPress website with or without the plugin.
Some themes do not come with a Back to Top button option, so you can add this button using a plugin.
If you are using the GeneratePress theme on your WordPress website, you already have the option to enable the Back to Top button in the theme’s customizer.
In this tutorial, first of all, I will help you to customize the Back to Top button on your WordPress website built with the GeneratePress theme using CSS.
Customize Back to Top Button in GeneratePress
I’m using the GeneratePress Premium theme for my websites. The GeneratePress theme is a great WordPress theme that comes with great features.
It has a lot of customization options and pre-built website templates with the Back to Top button option.
So let’s now start customizing the Back to Top button in the GeneratePress theme.
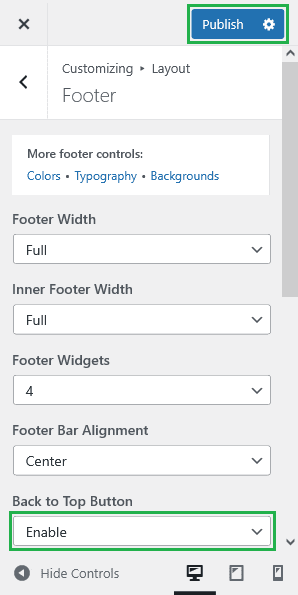
First, log in to your WordPress website dashboard and go to Appearance – Customize – Layout – Footer and enable the Back to Top button option.

Now click on Publish button to save the changes.
You have successfully enabled the Back to Top button for your website.
The next step is to customize the Back to Top button using CSS code.
By default, the Back to Top button in the GeneratePress theme looks simple. Some bloggers want some unique and decent look of the Back to Top button.
If you want to add a fixed Back to Top button on your WordPress website, then use the below CSS code on your website.
/* Back to top button styling by WPSettingbox */

.generate-back-to-top,
.generate-back-to-top:visited {
	  border-radius: 5px 0px 0px 5px;
	  border-top: 1px solid #222222;
	  border-bottom: 1px solid #222222;
	  border-left: 1px solid #222222;
	  bottom: 30px;
	  position: fixed;
    z-index: 99999;
    bottom: 125px;
    right: 0px;
	  font-size: 30px;
    padding: 5px;
	  cursor: pointer;
	  box-shadow: 0 2px 2px rgb(0 0 0/30%);

}

@media (max-width: 768px) {
.generate-back-to-top,
.generate-back-to-top:visited {
    display: none;
	  transition: all 0.2s ease-in;
      }
}
.generate-back-to-top:hover {
    box-shadow: 0px 5px 5px 0px rgba(0,0,0,0.3);
}
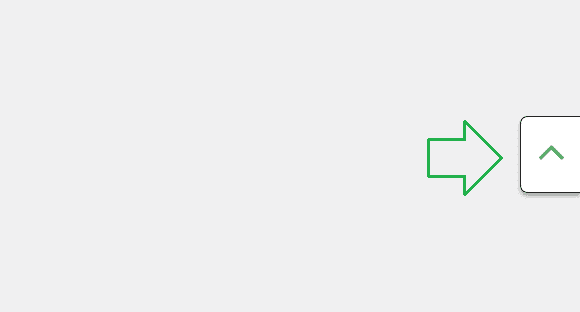
The above CSS code will add a fixed Back to Top button on the right side of the screen on your WordPress website.
See the screenshot below.

You can change the color of the Back to Top button by going to Appearance – Customize – Colors and Back to Top.
Or use the following CSS code to change the background and hover color.
/* Change Back to top button background and hover color */

.generate-back-to-top, .generate-back-to-top:visited {
    background-color: #ffffff !important;
    color: #000000 !important;
}
.generate-back-to-top:hover, .generate-back-to-top:focus {
    background-color: #000000 !important;
    color: #ffffff !important;
}
You can change the color of the #hex code as you wish.
Now let’s move on to the second method of adding the Back to Top button to your WordPress website using the plugin.
Add a Back to Top Button Using Plugin
Some WordPress themes do not have the option to add a Back to Top button on your website. In this case, you can add a Back to Top button on your WordPress website using the plugin.
You only need to install a plugin and use it to do that.
There are many more plugins to add the Back to Top button to your website, but I suggest you use Scroll To Top or WPFront Scroll Top.
Both the plugins are the best and easy to use.
To install the plugin on your WordPress website, go to Plugins – Add New and search for the plugin in the search bar.
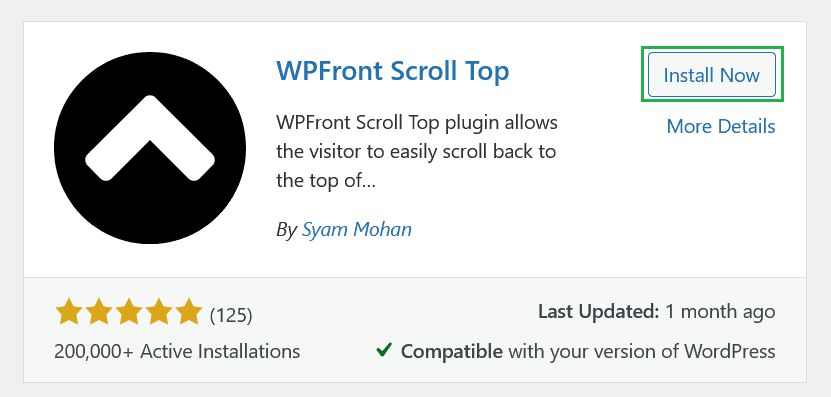
Now choose your plugin and click the Install Now button to install it, then Activate it to use.

I’m going to install the WPFront Scroll Top plugin. To configure the plugin settings, go to Settings – Scroll Top.
Now the plugin settings window will open.
Tick the Enabled option in the plugin settings and click the Save Changes button at the bottom of the screen.
Now a Back to Top button will enable on your website.
You’ll get more features in the plugin settings to change the Back to Top button style, size, location, scroll duration, and more for your website.
Conclusion
So in this tutorial, you have learned two following methods.
1. How to customize the Back to Top button on your WordPress website built with the GeneratePress theme using CSS?
2. How to add the Back to Top button on your WordPress website using the plugin?
Also, learn the customization of the Read More button and make the last sidebar widget sticky in the GeneratePress theme.
I hope this tutorial will help you customize and add the Back to Top button on your website.
If you feel any problems or have more questions about customizing the Back to Top button, you can hit the comment section at any time.
After using this CSS code, let me know how useful you found it for your website.
If you liked this article, please show your love by sharing it on your favorite social media channel and also send your thoughts in the comment section.
I love your comments. It makes me more precise to give you the best WordPress resources and guides.
You can follow WPSettingbox on Twitter and Facebook to get fresh and updated content.

